Tutorial 2: PyCKBot with Blockly
Welcome to the PyCKBot Block Editor! This is a tool you can use to generate Python code that will control PyCKBot modules.
Setup
To start, first set up your modules by plugging the power cord into a power supply or outlet and plugging the Bluetooth/USB converter into your computer. Check to ensure that the voltage shown on the power supply reads a voltage between 12 and 14.7 volts, as these are the safe levels for the modules. If not, adjust the dial so that the voltage is in the safe range.
Checking your Connection/Names of your modules
In Tutorial 0, you read about ckbot.Logical and L.Cluster, which look for physical modules and therefore allow you to check the connection to your modules. Review tutorial 0 if you need a refresher. Then open ipython in a terminal on your computer and type these commands:
import ckbot.logical as L
c=L.Cluster(count=x)  # (x = number of modules)
NOTE 1: If you have not used ipython before, type
which ipythonin your terminal to determine if you have it available on your machine. If a path to ipython shows up instead of an error message, you can use ipython. If not, install it or see NOTE 2 below.
If the modules are connected properly, you will see something similar to:

Note the names of the modules discovered - in this example, they are Nx10 and Nx04. These are your modules.
If you get a warning like “OSError: No serial port found and no glob hint given” even though your modules are plugged into your computer, it is likely that there is an issue with the modules - check that all wires are connected correctly.
Close ipython in your terminal by typing exit().
Once your modules are set up correctly, you’re ready to start generating code.
NOTE 2: If you do not have ipython, you can paste
import ckbot.logical as L
c=L.Cluster(count=x)  # (x = number of modules)
into a word editor such as Text Editor on Linux, saving the file as checkConnection.py. Then open a terminal and navigate to the folder containing checkConnection.py. Run python checkConnection.py. This will result in the same output as you would have gotten in ipython (see above for the specifics).
Generating code
For the next steps, you should be back on the PyCKBot with Blockly webpage. The box on the left of the page is the workspace, where you can choose from blocks in each of the categories in the left bar (PyCKBot, Logic, Loops, etc.). Take a look at the available blocks by clicking on each category. Focus especially on the PyCKBot blocks, as these were created especially for PyCKBot and contain some of the essential blocks for working with your modules.
Next, you can try dragging some of these blocks onto the white workspace in order to see the code generated and experiment with fitting them together. The Python code that corresponds to each block will appear in the box on the right labeled “Generated Python Code.”
As you explore the blocks available, you can connect them (build programs) or leave them separate. If you leave the blocks separate but in order, the code will still work (code will be generated in block order from top to bottom and left to right). Some blocks also have editable fields or drop-downs, which can be edited by choosing from the drop-down menu or typing in a number or word to customize your code. Also notice that blocks can only connect to other blocks in a certain way - you can use the connection types (left puzzle piece versus top/bottom connectors) as a clue for how blocks connect. You will hear a snap when they attach. If you want to get rid of a block in the workspace, drag it to the trash can in the bottom right of the workspace.
Intro to the PyCKBot Blocks
Below is an overview of the PyCKBot blocks, which will be helpful in creating programs specific for PyCKBot modules.
-
Once you are ready to build your program, it is important that you start with the purple “Initialize robot” block. This block ensures that your computer recognizes your modules at the start of the program.
-
The next block we’ll discuss is light green “Set position” block. In order to use this block as well as some others, it is important you know the names of your modules (see Checking your Connection/Names of your modules above). You should replace the default name, “Nx04,” with your module’s name by clicking into the lighter editable field and typing the correct name. Changing the position of the module by dragging a value into the puzzle piece connector causes it to rotate using a servo motor. A position of 0 is neutral, with the module vertical, and the allowed values for the Set position block are -8000 to 8000 (here the module will be rotated to the extreme/opposite positions). This means you will likely want to change the position by 500 or greater to notice a significant change.
-
The light green “Get_position” block can be used to tell you what position your module is currently in. If you would like to print a position to the terminal, use the print block in the “Text” category and attach the Get_position block to it (essentially covering the default “abc” string). Here is an example:

The Get_position block can also be used in other useful ways. For another example with this block see example 4 in the Example code section at the end of the document.
- When writing your program, you can define certain keystrokes to perform different actions, like setting the position of a module or printing to the terminal. This is what the blue c-shaped block is for. The drop-down in the block sets the keyboard key which will result in a certain action. Each key is represented in the drop-down by K_ plus the key name (for example, 0 is represented by K_0 and the comma is represented by K_COMMA). This action for a key is defined by a block which is inserted inside the blue block. For example, you can drag the light green Set_position block inside of the blue block. Here is an example:
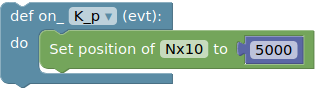
This combination of blocks defines the pressing of the ‘p’ on the keyboard (this is the event [evt]), to change the position of the Nx10 modules to 5000.
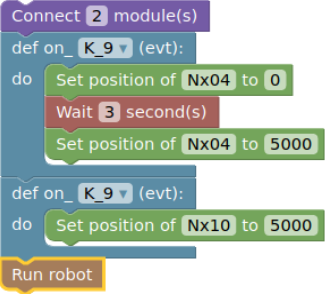
NOTE 3: Each key should have only one associated set of actions/action sequence. In other words, you should only have one def on_ blue c-shaped block per keystroke. For example, having a program built out of both of these blocks would not work because two def on_ blocks define conflicting actions for the key 9:
You can also have several events stacked on top of each other inside one def on_ blue block. For example, you could do this:
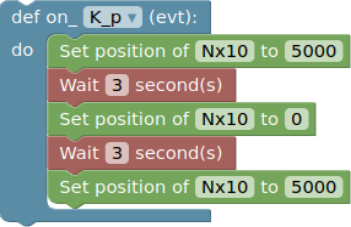
However, make sure that if you use multiple Set_position blocks for the same module that you have a red Wait block in between each Set_position block for that module to allow for some delay. If instead you want to stack two blocks changing the position of two different modules, you do not need this delay.
- Finally, you will need to end your program with the “Run with # module(s)” block. This block defines an important code import and runs a necessary script.
Writing a program to control PyCKBot modules
Once you have an overview of the blocks available, you can start building a program for your modules. Drag the blocks you need into the workspace and connect them if you want to. You will see your code develop in the right box. Beyond the PyCKBot blocks, there are many other blocks you can include in your programs. For example, you may want to use loops (repeat several actions until/while something is true), include if-statements (only perform an action if a certain condition is met), or print some text to the terminal when a key is pressed. This is all possible using blocks outside of the PyCKBot category.
Downloading and running your code
Once you are satisfied with your program, it’s time to run the code.
-
Downloading the code: Click on the “Download Generated Python Code” button at the top of the page and save the file, noting the default file name (robotCode.py). If you download multiple versions of your code and don’t rename them, note that subsequent versions will have a set of parentheses with the version number appended to the name.
-
Controller window: Next, you need to open a pygame window, which is the window that you will type your keyboard strokes in to create actions. For this, you will need to know where the pyckbot/bin folder is in the files on your computer (ask a teacher or computer administrator if necessary). In a terminal window, navigate to pyckbot/bin. Type
./ctrl, which will open up the control window. -
Running the code: In a new tab of the terminal window, navigate to the folder where you saved the robotCode.py file and run the command
python robotCode.py(replace the file name if you renamed it or if it includes a version number). This will start your program, and you will see output similar to this: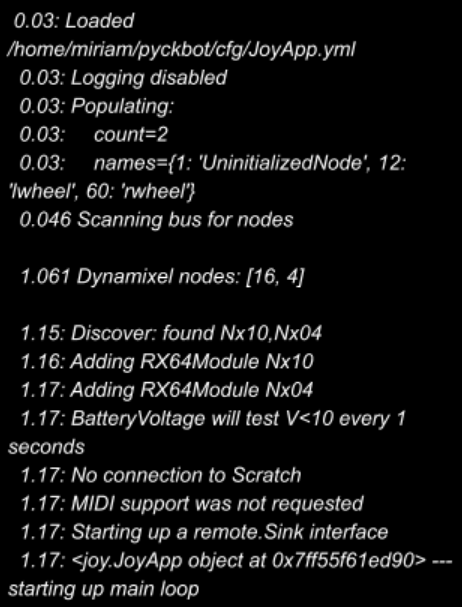
This means that your modules are connected properly and were recognized by your machine.
Hint: Make sure that if you use a file name with a set of parentheses you include a backwards slash \ before each open and close parentheses, like this:
python robotCode\(2\)This is necessary because the parentheses are special characters. It may be easier, however, to just rename the file without parentheses or spaces (spaces are special characters as well). - Terminal output and moving the modules: Change terminal tabs back to the tab where you opened up the pygame controller window. Now try clicking your mouse in the blank controller window, which is the window labeled “pygame window” in the title bar. You will see output in the terminal tab you just returned to corresponding to the action of clicking the mouse. If you type in the controller window, you will see similar output. This is where you can press a key for which you defined a certain action.
- Once you’re done running your code, type
control + cinto the tab where you ran your code (where you typed “python NAME_OF_FILE.py”) to stop the process.
NOTE 4: If you update your code and download the new code, you need to rerun the python command (“python NAME_OF_FILE.py”). However, you do not need to rerun the ./ctrl command in pyckbot/bin (the pygame controller window will stay open and can continue to be used).
NOTE 5: Next to the “Download Generated Python Code” button is another button named “Show Code.” This button will open a new tab or window (depending on your browser settings) with the generated code. From here, you can copy/paste the code into a different file. This is another way to save the code if you do not want to use the download button.
NOTE 6: if your modules do not respond to the code, make sure you checked if they were connected properly as described above in Checking your Connection/Names of your modules.
Example code
-
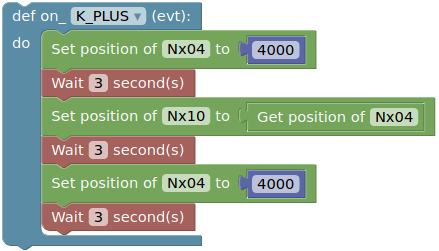
One key stroke definition with multiple events:
-
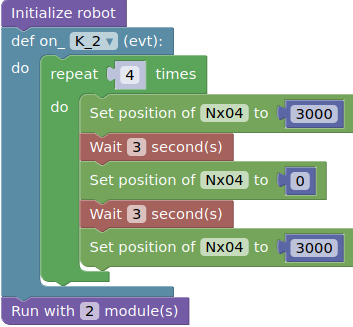
Two key stroke definitions plus looping:
-
Using the Get_Position Block:
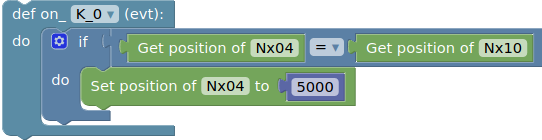
(If modules Nx04 and Nx10 are in the same position, set Nx04 to 5000.)